Running ReactPy#
The simplest way to run ReactPy is with the run() function. This
is the method you’ll see used throughout this documentation. However, this executes your
application using a development server which is great for testing, but probably not what
if you’re deploying in production. Below are some
more robust and performant ways of running ReactPy with various supported servers.
Running ReactPy in Production#
The first thing you’ll need to do if you want to run ReactPy in production is choose a backend implementation and follow its documentation on how to create and run an application. This is the backend you probably chose when installing ReactPy. Then you’ll need to configure that application with an ReactPy view. We show the basics of how to set up, and then run, each supported backend below, but all implementations will follow a pattern similar to the following:
from my_chosen_backend import Application

from reactpy import component, html
from reactpy.backend.my_chosen_backend import configure


@component
def HelloWorld():
    return html.h1("Hello, world!")


app = Application()
configure(app, HelloWorld)
You’ll then run this app using an ASGI
or WSGI server from the command line.
Running with FastAPI#
from reactpy import component, html
from reactpy.backend.fastapi import configure


@component
def HelloWorld():
    return html.h1("Hello, world!")


app = FastAPI()
configure(app, HelloWorld)
Then assuming you put this in main.py, you can run the app using the Uvicorn ASGI server:
uvicorn main:app
Running with Flask#
from reactpy import component, html
from reactpy.backend.flask import configure


@component
def HelloWorld():
    return html.h1("Hello, world!")


app = Flask(__name__)
configure(app, HelloWorld)
Then assuming you put this in main.py, you can run the app using the Gunicorn WSGI server:
gunicorn main:app
Running with Sanic#
from reactpy import component, html
from reactpy.backend.sanic import configure


@component
def HelloWorld():
    return html.h1("Hello, world!")


app = Sanic("MyApp")
configure(app, HelloWorld)


if __name__ == "__main__":
    app.run(port=8000)
Then assuming you put this in main.py, you can run the app using Sanic’s builtin
server:
sanic main.app
Running with Starlette#
from starlette.applications import Starlette

from reactpy import component, html
from reactpy.backend.starlette import configure


@component
def HelloWorld():
    return html.h1("Hello, world!")


app = Starlette()
configure(app, HelloWorld)
Then assuming you put this in main.py, you can run the application using the
Uvicorn ASGI server:
uvicorn main:app
Running with Tornado#
import tornado.web

from reactpy import component, html
from reactpy.backend.tornado import configure


@component
def HelloWorld():
    return html.h1("Hello, world!")


def make_app():
    app = tornado.web.Application()
    configure(app, HelloWorld)
    return app


if __name__ == "__main__":
    app = make_app()
    app.listen(8000)
    tornado.ioloop.IOLoop.current().start()
Tornado is run using it’s own builtin server rather than an external WSGI or ASGI server.
Running ReactPy in Debug Mode#
ReactPy provides a debug mode that is turned off by default. This can be enabled when you
run your application by setting the REACTPY_DEBUG_MODE environment variable.
export REACTPY_DEBUG_MODE=1
python my_reactpy_app.py
set REACTPY_DEBUG_MODE=1
python my_reactpy_app.py
$env:REACTPY_DEBUG_MODE = "1"
python my_reactpy_app.py
Danger
Leave debug mode off in production!
Among other things, running in this mode:
Turns on debug log messages
Adds checks to ensure the VDOM spec is adhered to
Displays error messages that occur within your app
Errors will be displayed where the uppermost component is located in the view:
from reactpy import component, html, run


@component
def App():
    return html.div(GoodComponent(), BadComponent())


@component
def GoodComponent():
    return html.p("This component rendered successfully")


@component
def BadComponent():
    msg = "This component raised an error"
    raise RuntimeError(msg)


run(App)
Backend Configuration Options#
ReactPy’s various backend implementations come with Options that can be passed to their
respective configure() functions in the following way:
from reactpy.backend.<implementation> import configure, Options

configure(app, MyComponent, Options(...))
To learn more read about the options for your chosen backend <implementation>:
reactpy.backend.fastapi.Optionsreactpy.backend.tornado.Options
Embed in an Existing Webpage#
ReactPy provides a Javascript client called @reactpy/client that can be used to embed
ReactPy views within an existing applications. This is actually how the interactive
examples throughout this documentation have been created. You can try this out by
embedding one the examples from this documentation into your own webpage:
<div id="reactpy-app" />
<script type="module">
  import { mountLayoutWithWebSocket } from "https://esm.sh/@reactpy/client";
  mountLayoutWithWebSocket(
    document.getElementById("reactpy-app"),
    "wss://reactpy.dev/_reactpy/stream?view_id=todo"
  );
</script>
Note
For more information on how to use the client see the Javascript API 🚧 reference. Or if you need to, your can write your own backend implementation.
As mentioned though, this is connecting to the server that is hosting this documentation. If you want to connect to a view from your own server, you’ll need to change the URL above to one you provide. One way to do this might be to add to an existing application. Another would be to run ReactPy in an adjacent web server instance that you coordinate with something like NGINX. For the sake of simplicity, we’ll assume you do something similar to the following in an existing Python app:
from sanic import Sanic
from sanic.response import file

from reactpy import component, html
from reactpy.backend.sanic import Options, configure

app = Sanic("MyApp")


@app.route("/")
async def index(request):
    return await file("index.html")


@component
def ReactPyView():
    return html.code("This text came from an ReactPy App")


configure(app, ReactPyView, Options(url_prefix="/_reactpy"))

app.run(host="127.0.0.1", port=5000)
<!DOCTYPE html>
<html>
<head>
<meta charset="UTF-8" />
<title>Example App</title>
</head>
<body>
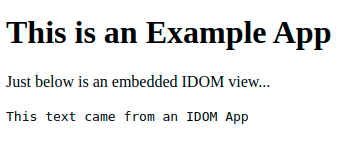
<h1>This is an Example App</h1>
<p>Just below is an embedded ReactPy view...</p>
<div id="reactpy-app" />
<script type="module">
import {
mountWithLayoutServer,
LayoutServerInfo,
} from "https://esm.sh/@reactpy/client@0.38.0";
const serverInfo = new LayoutServerInfo({
host: document.location.hostname,
port: document.location.port,
path: "_reactpy",
query: queryParams.user.toString(),
secure: document.location.protocol == "https:",
});
mountLayoutWithWebSocket(
document.getElementById("reactpy-app"),
serverInfo
);
</script>
</body>
</html>
After running python main.py, you should be able to navigate to
http://127.0.0.1:8000/index.html and see: